This type of Mix & Match offer gives the customer a fixed price for the offer.
1.Enter a 'Name' for the offer. This will appear on the receipt when the offer is applied and also on the reports to show total discounts.
2.'Mix&Match Discount Type' - select 'Set Price'.
3.'No. of Discounts' per transaction limits the number of discounts that can be applied in one transaction. 9 means unlimited offers per transaction.
4.'Type' is fixed to 'Amount' (a fixed amount).
5.'Amount' is the fixed price amount. In other words, when this offer is applied on the till, this is the price that is registered.
6.'Always Enabled' means the offer is always active once it is downloaded to the till.
7.If 'Always Enabled' is unticked then the 'Start Date' and 'End Date' become available. If the date is outside the range then the offer will not be active.
NOTE: The Cloud supports an 'Auto Prepare Data' option on the 'Organization' screen. This causes pending till changes to be automatically prepared during the night ready for a start-of-day OPEN on the till the next trading day. In this way, Mix & Match offers can be made to activate and de-activate on a daily basis as required (see next option).
8.'Mark days of a week when this offer is active'. If 'Always Enabled' is unticked, you can tick the days of the week on which the offer should apply. You should use this feature in conjunction with the 'Auto Prepare Data' feature. See .
Adding Items - for more detail see
9.In the 'Search' box select a 'Department'. All items associated with that department are then listed in the box below. Highlight the item you want to include in the offer and click 'Set' on a 'Positions' line to include it in the offer. Change the 'Quantity' next to the item. This is the number of that item that must be purchased to qualify for the discount.
10.Alternatively, you can set the search option to '*** Departments ***' and it will list Departments instead of PLU items. You can then use the 'Set' button to add the Department to the offer. This means that ANY item in that Department will qualify for inclusion in the offer.
11.In ERA 2, you may also select '*** Classification (Parameters)***' or '*** Classification2 (PLU) ***'. These are new options in ERA 2 that can be thought of as sub-departments - the former is controlled via the 'Item Parameter' setting, the latter at PLU level. See Item Classification for further details on 'Item Classification'.
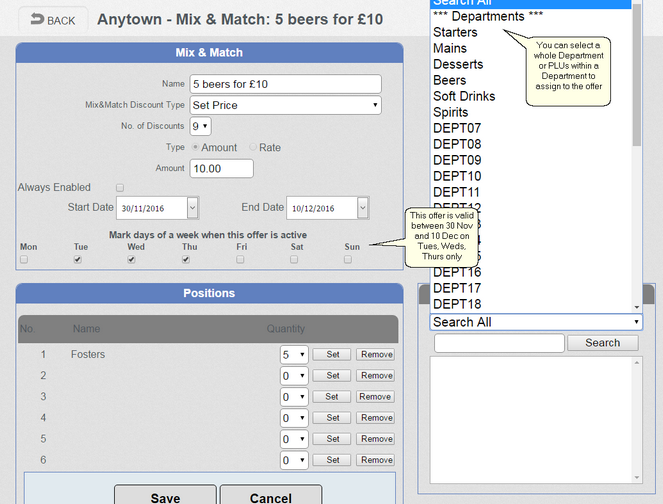
12.You can remove an item from an offer by clicking the 'Remove' button.
13.Click 'Save' to save your changes or 'Cancel' to abandon changes.