When creating a Mix & Match offer, you first specify the offer type and then the conditions for that offer. For ERA 2.1 and greater, it is also possible to program a schedule for when the offer will apply - the user interface is therefore slightly different depending on the version of the Cash Register application in use on the Cloud account.
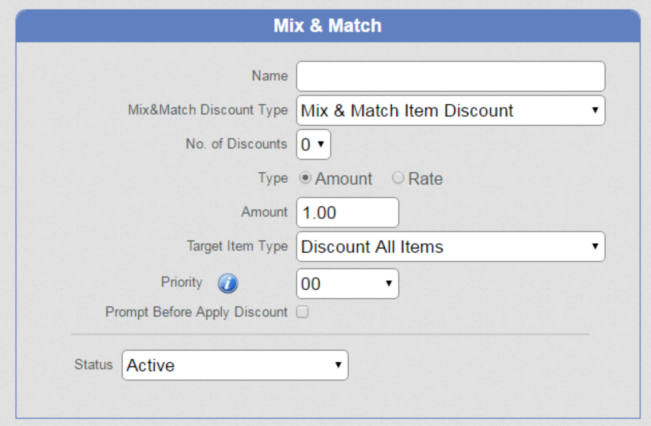
For ERA 2.1 and greater

ERA 2.1+ Mix and Match schedular e is controled on the ECR
1.Enter a 'Name' for the offer. This name will appear on the receipts when the offer is sold on the V-R. It will also appear on the Mix & Match reports. Examples would be 'Fosters (pint) - 2 for 1', '2 for 1 Pizzas', etc.
2.Select a 'Mix&Match Discount Type'. There are three types of Mix & Match discount - 'Mix & Match Item Discount', 'Set Price' and 'Mix & Match Set Price'. See the next few sections for detailed information on each type of discount.
3.Select the 'No. of Discounts' that can be applied in one transaction. For example, this might be used when an offer is limited to two offers per transaction. Setting this to 9 means unlimited instances of this offer can be applied in one transaction.
4.'Type' sets whether the discount as a fixed 'Amount'(as in a '5 beers for £10' offer) or as a 'Rate' (percentage) (as in 'Half price Vodka shots').
5.Depending on the setting for 'Type', this field will either be 'Amount' or 'Rate %'.
6.The 'Target Item Type' field will only appear when the 'Mix&Match Discount Type' is set to 'Mix & Match Item Discount'
7.'Priority' can be a numerical value between 0 and 99. This setting is used when two or more Mix & Match offers could be applied to the transaction. In cases like this, the system will look at the 'Priority' of the Mix & Match offer and the one with the lowest number in this field will be applied (i.e. 0 is highest priority).
8.'Prompt Before Apply Discount'. This feature is only available to the US market.
9.'Status' can be set to 'Active', 'Inactive' or 'Controlled by Scheduler' . The first two allow you to turn an offer on or off. The third allows you to configure the Scheduler to set up sophisticated control of the offer (see )
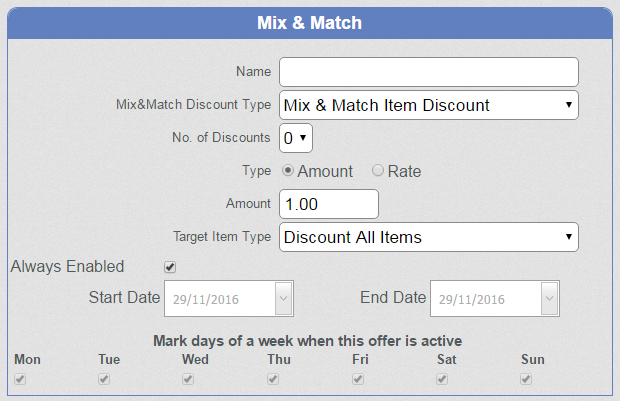
For version 4.x and 2.0.2

Pre ERA 2.1 Mix and Match schedular is controled on the Cloud
1.Enter a 'Name' for the offer. This name will appear on the receipts when the offer is sold on the V-R. It will also appear on the Mix & Match reports. Examples would be 'Fosters (pint) - 2 for 1', '2 for 1 Pizzas', etc.
2.Select a 'Mix&Match Discount Type'. There are three types of Mix & Match discount - 'Mix & Match Item Discount', 'Set Price' and 'Mix & Match Set Price'. See the next few sections for detailed information on each type of discount.
3.Select the 'No. of Discounts' that can be applied in one transaction. For example, this might be used when an offer is limited to two offers per transaction. Setting this to 9 means unlimited instances of this offer can be applied in one transaction.
4.'Type' sets whether the discount as a fixed 'Amount'(as in a '5 beers for £10' offer) or as a 'Rate' (percentage) (as in 'Half price Vodka shots').
5.Depending on the setting for 'Type', this field will either be 'Amount' or 'Rate %'.
6.The 'Target Item Type' field will only appear when the 'Mix&Match Discount Type' is set to 'Mix & Match Item Discount'.
7.'Always Enabled' - If this is ticked, the offer is turned on all the time. If unticked, the offer works as configured by the next setting.
8.'Start Date' and 'End Date' specifies the dates between which the offer will be active if 'Always Enabled' is unticked. You then need to tick the days of the week on which the offer will be active. This setting works in conjunction with the 'Auto Prepare Data' option in the 'Organization' screen - the system will turn the offer on and off each day depending on the schedule you set and will prepare the till programming data at a set time in the night before the business day starts. See for details. An 'OPEN' must be performed on the till to action these auto-prepared changes.
You can action changes immediately by performing a 'Prepare Data for Sending' in the Cloud followed by an 'OPEN' on the till.