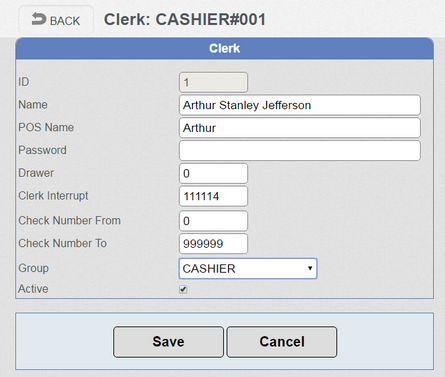
Click the 'Add New Clerk' button. Enter the appropriate settings as described below and click 'Save'.

➢Name - The full name of the Clerk. This will be used for reporting purposes.
➢POS Name - The name shown on the POS terminal. It is often the first name or nickname of the Clerk.
➢Password - If required. The password can be alphanumeric.
➢Drawer - If multiple drawers are in use, a Clerk can be assigned to a specific drawer.
➢Clerk Interrupt - This is used to allow the interruption or suspension of a transaction in a non-Table setup. Basically, the Clerk can go away, another Clerk can use the till, and when the original Clerk returns they can pick up their transaction where it left off. So the Interrupt works like a temporary Check number. This is often used in busy pubs. It is important that Clerk Interrupt values are not set to numbers that can clash with Table numbers if a Table tracking setup is being used as this would lead to conflicts in the checking process.
➢Check Number From / Check Number To - In ERA 2.x and upwards, Clerks can be limited to only a set range of tables. Use these parameters to set this range.
➢Group - This puts the Clerk into a 'Clerk Group' and therefore sets what restrictions may be in place on the operations this Clerk can perform. 'Clerk Group' settings are not set in the Cloud Suite - they must be configured on the EPOS terminal.
➢Active - You can activate or deactivate a Clerk using this checkbox.